The New Header

The New Header

Saturday 2 August 2014

I May Not be Awesome...But My Helmet Certainly Is.


The epic ongoing saga of my helmet's defacing is in year two now and what a lineup up of epic racing drivers that star this year. 

Living legend Johnny O'Connell piloting the earth moving #3 Cadillac Racing CTS-V.R.  He has way too many career highlights that I cannot go through them all here.

The second factory driver and just as much of a legend as his teammate, racing for Cadillac Racing in the #8 CTS-V.R, Andy Pilgrim.

And making a complete surprise appearance on my helmet, a driver who raced in the 24 hours of Le Mans and is one of the fastest racers in the IMSA Tudor Racing Series in the super competitive GTLM class.  He came from his regular #93 SRT Viper GTS-R viper to race on the Streets of Toronto in the classic red and white striped liveried #97 Viper GT3-R, factory driver for SRT Motorsports, Kuno Wittmer.

This was a great chapter to the story of my helmet, and the rest of the 2014 Honda Indy story is coming up soon.

This was also a milestone for my blog as this entire post was completed using nothing but mobile apps other than an upload issue with the Blogger app that would not upload my photos. (I'm working on that issue), and a couple of the graphics I used.

Because it takes my laptop five minutes to boot up I have decided to experiment with this, and hopefully I willl be able to do this entirely on a mobile device in the future.

All the photos were taken on my Moto-G phone.  I used Aviary and Photoshop Mobile for the photo manipulation, and I used Photo for the text compositing.  What a world we live in where I can do all of this on a 4x2.5 inch screen.

Thursday 24 July 2014

Montreal Sugar Bomb vs The Wash and Wax


I have never actually ever done a product review, other than that Tesla a bunch of moons ago.

It's because a lot of my product purchases are all about where I might have seen an advertisement, and really those products have had so many write ups that what is the point of another one.  But, with this product, I've never actually read one before so why not write one up for it.

Oh, and before you say that I'm easily influenced...yes, I am, and I'm one of those who is influenced by the marketing strategies designed up by those evil corporate marketing geniuses.

If I see a new product in Grassroots Motorsports Magazine I'll be tempted to purchase that product.  If I see an ad from Walmart or Canadian Tire, I am rarily influenced.  That's because I view Grassroots Motorsports Magazine as the people who would only place an ad if they truly believe in that product (which I know is probably completely false).  But, I view those big box stores as corporate money makers out only to make the shareholders richer, and truly don't stand behind "Product X's" claims.  As along as product X pays the bills, they are content.  Why else would we see crazy products like those silly gas additives claiming more power, and better efficiency.

I think I'm getting off track here. Let's get back to why I'm writing this blog and talk about the story at hand.

My friend Wayne Yeates at Way's Performance Services (Maybe I've written about him say, a hundred times now) gave me a product to try out.  It is called Emzone Waterless Wash and Wax.

So let's see the claims...As easy and spray and wipe, check.   No water needed (unless you took your vehicle mudding or off-roading in a swamp, or had some stupid kids throw a sugar bomb at your car), check.  Made in Canada, check.  Convenient to carry around in your trunk because you all know, a clean car gets you the B's, check.  Let's wash this motha!!!

I've been holding onto it now for the perfect time that I could use it.  And that time was a couple of weeks ago after a trip to Montreal.

One night I was a victim of a targeted sugar bomb attack in the suburbs of Montreal.

Before I continue, a sugar bomb is a balloon or condom filled with concentrated sugar syrup, AKA, simple syrup to all those chefs out there.  You throw said filled balloon at any passer-byer, car, horse, or what have you and as the water evaporates, what's left is a thick, crystally layer that is harder to chip away than winter ice.

Because I'm from the centre of the universe known as Toronto; and I have the Ontario license plates to prove it, one morning I stepped out to a car completely covered in the caked on crystally mess of dried sugar.  Its not fun to scrape it off the windows, and rinsing it with a hose leaves a cloudy residue on everything.

After giving the car a good hose off from the kindly landlord who was in charge of the building I was staying at, and going to the car wash and getting the luxury executive wash and wax, the residue still stuck on like peanut butter and honey on a child's fingers.  It was time for a good hand wash and wax.

I gave the Sentra a good hand wash to get rid of all the residual crud, and dried it off thoroughly.

The proper tools to use.
Then I started with the Emzone Waterless Wash and Wax.  It seemed like it would be simple enough with the glowing product endorsement right on the bottle.  You have to believe the bottle right?...don't.

Yes, it works OK, but after following the instructions I was not getting the proper finish as they advertised, on the bottle.  Liars?!?

Here are the bottles instructions.

• Work in a shaded area for best results. - Duh.
• Rinse off excess mud or dirt if necessary.- I realize that.
• Shake can well before spraying. - I have used spray paint before you know.
• Spray a light coat on a small surface area (1 m² / 3 ft²) and allow 30 sec. to loosen and lift dirt.
• Gently wipe in a circular motion using a terry cloth or microfiber towel to lift away the dirt.
• Using a second, clean microfiber towel, lightly buff area to bring out a high gloss shine.

Do not use one of these wax buffing pads.
They are just too small to get to all the
surface in time before the wash and wax
dries out.
Experimenting around with the way I applied it, did create the results that I wanted, but it was a lot of experimenting.  I think that at the end of the day it always will depend on where you are using it.

I was in a moderately windy driveway, and the temperatures were also moderate.  What killed me was the wind.

I did end up switching over to my standard Mother's Synwax for the large flat areas like the hood, and roof top because it is always dependable for a glassy, deep finish.  I found that the spray and wash just showed too cloudy and streaky for those flat surfaces.

A close up of the
Emzone Wash and Wax after
getting the proper technique
of applying it correctly.
I will say though, this product if applied perfectly will create a lasting finish.  It's been 3 weeks now and the car still feels smooth in the areas that I used it.  Just the same as the Mother's Synwax.

Here are my notes though about what I had to do to get a good finish.

  • Be quick and don't do the area that they recommend for spray. Especially in windy areas. Let dry for no more than 10 seconds 5-1- seconds in slight wind. No sun.
  • Spray about 1.5 square feet. (Not 3 square feet that they say)
  • First wipe with very soft microfiber about 5-10 seconds after. Wipe immediately with a very short haired microfibre cloth that is a bit harder.
  • It is very difficult for consistency of finish especially since some over spray exists and will harden.  You will need to go over the over spray parts again.

Looks good right?
So the end verdict.  Is it better?

The answer, yes and no.

If you don't have access to water then yes it is better than nothing but it won't work if you have solid particulate like caked on mud or thick dust or rust proofing.

It was good in combination with a good water wash initially.

It is faster than traditional wax but no where near as effective. Again, better than nothing.

It does leave the car feeling like it was just waxed but it just is not as deep of a shine than traditional synthetic waxes.

But, if you have access to water for a good hand wash, and a little bit of time, then only use the traditional waxes especially if you have been sugar bombed....DUH!


Saturday 14 June 2014

And Like Muscle Milk Pickett Racing...I am Out.

No Racing for Me This Year
It's a sad day for Twinchracing today after making a very tough choice.  We (and when I say "We", I mean "I") have come to the conclusion that I need to step aside from the Push it to the Limit Autocross Series this year to refocus our (and when I say "Our" I mean "My") attention on more pressing matters.

I never did get my season started, but I had the hope in my heart that I would be able to rejoin my racing friends in the fray.

Unlike Musclemilk Picket Racing, I can give an explanation why I need to take a hiatus from racing this year.

I have been out of work since Dec 4, 2013, and right now there is still no work available for me.  Unemployment Insurance is helping me keep my life afloat, however, such luxuries as racing has now forced my hand, and I have got to set my priorities.

Either racing, or living in my car.  I am sure there are a lot of people out there that would choose the latter.  I applaud all of those people, and there courage, but I unfortunately do not have that courage, and I have chosen the lame choice of concentrating on finding a job.

I am going to continue working on the E-Crosser, and keeping the Sentra maintained and ready for racing just in case I do find a job, but until then, She waits...quietly...waiting to roar again, and sink Her meaty R-Comps into the pavement.  And she will, trust me.  She will be ready to eat some pavement in anger.

Until then though, I will be doing my best in order to get my ass back in the driver's seat.

Oh, and just so you all know, I am not dissing Musclemilk Pickett Racing for their actions.  I am sure that they will be back, and my favourite P1 (now P2) team will be back racing.  Hell, Dyson Racing is back after racing last season in the American Le Mans series in P1, going from prototypes to Bentley Racecars in the Pirelli World Challenge.

Life just keeps getting more interesting.

Wednesday 30 April 2014

Who likes 3D Models?

My background is 3D Modelling and Animation.  I have more than a decade in the industry creating 3D models for a number of different clients, so, I thought I would create a cool little turntable animation showing the E-Crosser LMA V4.

It is about 31 megs in size.  If you have a dial up connection (first I have to ask,"You have dial up?!?) then leave the room, go to you local Starbucks, get a coffee, hang out and flirt with the barista for a good 15 minutes or until they have had enough of you and kicked you out for unwanted sexual advances.

Next, maybe take a walk over to your nearest movie theatre, and buy a ticket to watch a really long movie.  Something epic usually does the trick, those are always more than 2 hours long.  But remember, don't get the one that is just about to start, get a ticket for the one that is at least 2 hours away to start.  After the movie, you can come back home then and see this amazing video of the E-Crosser.

After watching this 10 second video, call up your internet provider and get into the 21st century and get some high speed internet.  Geesh and Enjoy.

Tuesday 29 April 2014

E-Crosser LMA V4 - Preliminary Press Report

This last month has been another one of those months with an unplanned family emergency.  I did however, finalize the E-Crosser design and created a press report with some of the specs.

I think I may have mentioned this once, or twice, or maybe even 20 times, but I really like how the E-Crosser has evolved into this kickin' coupe.

Here are the press report pages.
Page 1

Press Report-Page 2

Press Report-Page 3

Press Report-Page 4
On other exciting news, the Spec-V is finally having a whole new upgraded steering rack installed.  The rack bushing was completely dead and the slop was creating an annoying situation where the steering wheel would change alignment during heavy cornering or even when turning the steering wheel as the car sat still.  There was just too much stress for the OEM bushing and with a "pop" the rack would shift a fraction of an inch, and then I would have instant Angular Steering Wheel Syndrome (or ASWS).  Yes, it's an actual diagnosed syndrome, look it up.

A whole new delrin bushing was lathed out by Wayne at Way's Performance Services (I'm sure I've mentioned that name once or twice on this blog) and this bushing should eliminate any movement in the rack.  Let's hope that this cures this ongoing issue that has been the bane of my existence especially with the sticky R-compound tires.

I'm very excited for this upgrade.

Today's Inspirational Words

"Live life 1 cone at a time." 
- Somebody or other at an event just before getting smacked. -


Wednesday 19 March 2014

Squares and Triangles to Find the Centre of a Circle.

As simple as the concept seems, finding the centre of a circle exactly is not the most simple proposition.

Why do I need this Circle Centre Finder?

Well, Charlie, I need this so I can accurately drill out the centre of my Delrin endcaps that I am installing on my solid motor mounts.  These endcaps are a fail-safe in the case that the solid rubber tries to push out of the motor mount.

But really, this tool will be useful for finding the centre of any object, not just a circle.  It can work with non-circles too like ovals and squares.

To the left you will see the final motor mount I built using this circle centre finder tool and my home made drill-press.  Pretty right?  You may also notice that the small motor mount in the front has an off-centre sleeve.  The circle centre finder tool is only good for finding the exact centre of an object.  Anything off-centre requires a bit of math, or a template, so the larger motor mount endcap was the only one I used this circle centre tool with.

Now you may ask yourself,"When was this centre finder contraption invented?"

Back in the day, when wagon builders had to make wagon wheels, finding the exact centre was a hit or miss practise.  With wobbly off-centred wheels the pioneers ventured forth into the unknown wilderness.  It may have been easier if finding the centre of the wheel for the axle wasn't an impossible task.  Pushing forward into the frontier, and wild west was a bum-damaging proposition.  There had to be a better way, but everyone back then was either drunk, or constantly fighting off invaders from taking over their prized acre of potatoes and corn.

It was only until the industrial revolution that a solution could be invented.  With the wild-west won, and with families making crap loads of money from working 20 hours a day in the factories in the city, people could afford butlers then, and with those 4 hours a day of relaxation away from the factory, people could think of inventing things to find the centre of a circle.

Now, this history I just supplied is completely false, but, someone at one point in time had to invent a way to find the centre of a circle.  This is especially important for someone working on the lathe, spinning lengths of wood or metal at high speed and widdling down the edges to create perfect cylinders and baseball bat shaped things.

So who was it?  The inventer was Rod Bar Circle Centre-Finder or RBC as his friends used to call him.  Again, I'm messing with you.  I honestly don't know who invented the circle centre finder, but I'm sure the internet has many, many, many histories, mainly all fake ones, just like mine.  The history is not what is important (at least to me), but really, what is, is how we can now find the centre of a circle without a lot of math and measuring.

I have a friend who has a small circle centre finder made by Veritas that was sold in Lee Valley Tools back in the day.  They didn't have the exact tool that he showed me now, but they did have a wall mounted unit specifically for wood Veritas Circle Finder.  As you all know, I am not in work at the moment (I'm looking hard though), so using 25 dollars to purchase this item was out of the question.

I did study it, and learned its magical properties though.  Once I learned, I decided to build.  But being a good designer, I sketched things out first, then built a template.

So let's begin then in making your own Circle Centre Finder.

Print out my template and instruction sheet.  It prints out on an 8.5" X 11" sheet.
Template-Cut the solid lines(except for the squiggly lines that's where you glue)
Fold the dashed lines.
Instructions
Materials:

  1. My template and instructions.
  2. Melton Board or any other material you feel confident in working with.
  3. Utility Knife and ruler or any cutting tool to cut your material of choice accurately.
  4. Hot glue gun or any other adhesive depending on your material of choice
  5. Non shaky hands for accuracy or rock solid hands, depending on your material of choice.

You need to have some sort of material that is rigid to avoid flexing when you are using it.  Flex is bad because with flex, comes inaccuracy to finding the centre. Your material of choice also needs to be easy enough to work with so you can cut out the template and fold it properly with very close precision.

I used Melton Board.  This is a fairly cheap mounting board that I used a lot during my college years to mount my projects to.  It is very sturdy, easy to cut and glue, and simple to bend if you score the surface.

How to Use the Super Cool Circle Centre Tool.

Once you finish building the tool, you can now find the centre of any object, of course only up to a certain size depending on how large you make it.  Mine is a 5" X 5" square so I can go up to 8" diameter size of circular object, or up to 5" X 5" square object.

Step 1.
Place object that you need to find the centre of so it is pushed tight against the 2 walls of the tool.
Step 2.
Flip over the tool, making sure to keep the object in place so it does not move around.  If it does move, even the smallest amount, go back to Step 1 and start over.


Step 3.
Draw a line using the 45 degree ruler edge.
Then spin the object 90 degrees, or any other amount, and repeat Steps 1-3.
Do this as many times as you feel but really you only need 2 lines to find the centre.

Step 4.
Now you have intersecting lines, and where those lines intersect, is the centre of the object.
Behold the majesty of knowing where the centre is.
Step 5.
Do whatever you needed to do with the centre of the object.

It's as simple as that.

Can you smell it?  I can almost smell the burning smell of rubber from locked brakes.  It's almost Autocross season!!!  Which means I have a lot of prep to do.

Thursday 20 February 2014

Drill Press Proof of Concept


A couple of posts ago I mentioned that I designed and built a drill press that my power drill would attach to.

Well folks, here is the proof of concept video.  It isn't very refined or polished, but it shows that the concept works...generally.

There are some niggly issues that still need to be resolved.

  1. The extension spring that is meant to pull up the drill once released is not heavy enough to pull up the weight of the drill, so I may need to find a heavier weight spring.
  2. With the longer length drill bits, I do not have enough space for anything thicker than 1/2".  I will probably just use a thicker mounting base to give me the height I need.
  3. The speed of drill is very inconsistent with me just holding the trigger.  The speed was just way too out of control.  I may have a solution though.  In the video you can see the small screw-type band clamp hanging off the end of the drill handle.  I used it once, around the trigger and handle and tightened it which pressed in the trigger.  It worked but was a bit clumsy to operate.
  4. The base is too small.  Good thing it's a disposable piece, so I'll use it up, and make a larger one.  For now though, I'll make do.
Now, I just need to make the improvements, and do another test-drive.  

Once I am happy with how it operates, I will disassemble the press, and finish up all the detailing.  I will need to re-sand some edges, rounding off some sharp edges and squaring off some of the notches.  Also, I will be painting the pieces so it has a nice finish.

In my quest to find a job, I'm trying to master Solidworks, so I'll be posting up the full technical package in the case you may want to build one too.  That should be done by the end of next week.

I have quite the list of things I need to make accurate holes into, and disks I need to cut out, so it won't be soon enough once this is drill press is complete.

Anyways, just a short post as I have to take care of our dog Bradley who just came out of bladder surgery yesterday.  I'm running off no sleep right now.

Oh, and this warmer weather is really making me ansy to get prepared for this season of racing.  I have a laundry list in my home of things to do. Sigh...

Tuesday 18 February 2014

Does Tesla have a Winner? I think so.

Large? Check

Heavy? Check.

Expensive? Check

Completely and utterly addicting to the extent that I would start up a commercial spaceflight company, and an electric car company, just so I could allow others to experience the joy of copious amounts of torque and linear power delivery?  Check.


We have all heard of Elon Musk, or at least, we've all heard of his companies Space X, and more importantly, Tesla Motors.  And because this blog is about me, trying to design, and build an electric autocrosser, I thought that it might be relevant to drive the all new Tesla Model-S with the P85+ performance package.

Now a little history, not that I think anyone needs it.  It's just good writing.

Tesla Motors was founded in 2003 by a number of really smart, really forward thinking, and completely bonkers big wigs.  The one that we all know is Elon Musk.  This guy, in my opinion, is the guy who will change the world.  Not just because of Tesla, but his whole way of thinking so forwardly for humanity and the world in general.  With Space X, he wants to make space travel viable to humans so we can get off this rock and further our presence out in the universe.   But for this blog, that is beside the point.

Tesla created a "proof of concept" vehicle with the Tesla Roadster in 2006 for the prototypes, and 2008 for the "mass" produced versions.  It was basically a Lotus Elise that was customized and fiddled with so that a whole new type of car was developed.  A fully electric car that was ridiculously not-boring.  It was a brave new step for all gearheads.  This was no EV-1.  This was an actual, functional, realistic car, that had great range(for electric), and handling to match.

Only 50 made it to Canada, and I have had the pleasure of sitting in 2 of those cockpits.  Not easy to get in, but then, that's like saying, planes are not comfortable or smooth while they taxi down the run-way.  Of course it's hard to get in.  That's not what the car is built for.

After the contract expired with Lotus, and the 2500 Elises that were to be used were converted, it was then time to focus on a real world car that would aim squarely at the BMW-ers, Mercedes-ers and Audi-ers.

That is where the Model-S comes in.  With 3 different flavours the Model-S comes in 60kwh, 85kwh, and P85+.  The latter is the highest end version, with performance goodies like an equivalent power rating of 416hp/443ft-lb.  I've seen dynos that showed much more horsepower than that, but still, 416hp, with all that torque right from 0rpm, well, there is no other word to describe it other than,"WEEEEEEEEEEEHAAAAAAAAA!"

And those words came out of my mouth more than once when I took the test drive.  Invited by Tesla to go for a test drive from the Steamwhistle Brewery in the heart of Toronto (I've done the brewery tour 4 times now and I will do it again.  Granted, I'm a bit of a beer nut.) to the Evergreen Brickworks which is a jaunt on the Gardiner Highway to the DVP artery.  I got to experience the Model-S in all sorts of traffic and tight confines of a parking lot full of cars and families going to go skating.

The exterior dimensions are mammoth,  The P85+ is almost 5 metres long, and 2 metres wide. And even though it is so large, it doesn't have that sort of in your face bizarre unnaturally forced design like the Porsche Panamera.

It doesn't look like a car that was originally something else, and in order to make it fill a niche, extended, added 2 more doors, and threw design out the window.

The Model-S is a stunning car.  It has a nice low stance.  The design flows from the front grill all the way to the rear lights.  Granted, it comes with 21" wheels wrapped in Michelin Summer rubber usually, but because we are in the dead of winter, I was on 19" winter tires.  It still looked kickin' good, and I even got some, "Nice Tesla" from passer by-ers.  I would even choose the 19" rims because they are lighter and with a car with this kind of prowess, less unsprung weight is always better.

I didn't care about the luxuries.  I didn't care about the seat warmers, and sound system.  I even stopped the representative before she could even start, and stated that I was purely there to test drive the car.  She was completely understanding and with that I pushed on the retracted aerodynamic door handles.  They gently slid out inviting me to open the door and slide into the driver's seat.

The leather seat was initially very comfortable.  I adjusted it electrically so I was as upright and as low to the floor as possible.  The seat would soon show it's weaknesses though.

The car is much larger than a car I would be comfortable to drive daily in though, where I live in downtown Toronto.  Trying to park in my 1 car garage in my town home complex would be a chore in itself, but, I could still see the relevance to the vehicle, and I truly believe that if any vehicle has to come into downtown, it should be electrically driven.  Electric cars are the vehicles for the city.

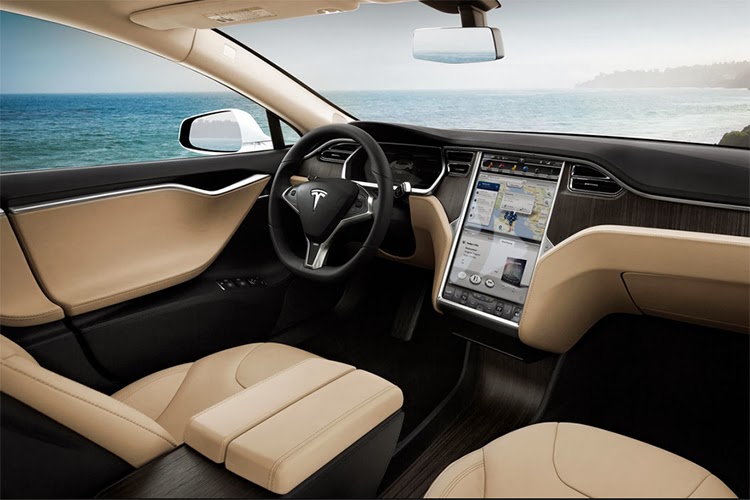
As I sat into the driver's seat I immediately noticed how spartan the cabin was.  It felt very wide and open, and yes, the car is massive so I would think any car this size should feel huge inside, but this is a whole different level of openness.  I could put 4 of my dog in the back seats alone, with one on the floor.  And he's a 38kg guy!

I could also put another 5 of him in the trunks.  I say plural "trunks" because there are 2.  One in the front, like a Porsche 911, and one in the rear like any other car.  This car is an ocean-going container ship.  The amount of cargo space is huge.

I did notice though that the rear window seemed small. The C pillars blocked a lot of my view, and this was evident when I had to do a 4 point turn at the Brickworks to turn around, while making sure I didn't run over any children.

I chose to have the car's regenerative braking pull harder so as soon as I released the go pedal the car would slow, similar to the engine braking in a standard transmission car in a short gear.

I also had the steering weight put into sport so it would be as heavy as possible.  I would soon find out that this system is a bit quirky.

The steering wheel, I will say, is almost perfect for me.  It is very thick, and has a pleasant tactile feel  It's not too large in radius, and it feels sporty enough to me for a touring car.  There are no buttons, or consoles that impeded my hands in anyway.  I find now a days these convenience buttons get in the way of actually holding onto the steering wheel properly, as if raising and lowering the radio volume is more important than actually gripping the one and only thing that keeps you following the road.

It is fully adjustable and I found the perfect position to enjoy the experience as much as possible.  There is nothing worse than an improperly placed steering wheel.

Placing my foot on the brake pedal I shifted the column mounted gear selector into 'D'.  It reminded me of my parent's 1979 Chevy Malibu Wagon.  Not because the Tesla was anything similar, but that column mounted gear selector really felt old-school, having to make a knuckle-sandwich reversed fist.  I would call it almost "nostalgic-design".

A couple of times I went to press in the clutch.  A force of habit I'm sure.  This was my first automatic in quite some time, and I will say right now, if all automatics were like this car, I would almost consider an automatic transmission in my next car.  But since this car has only 1 gear, I can't imagine any automatic being this good.

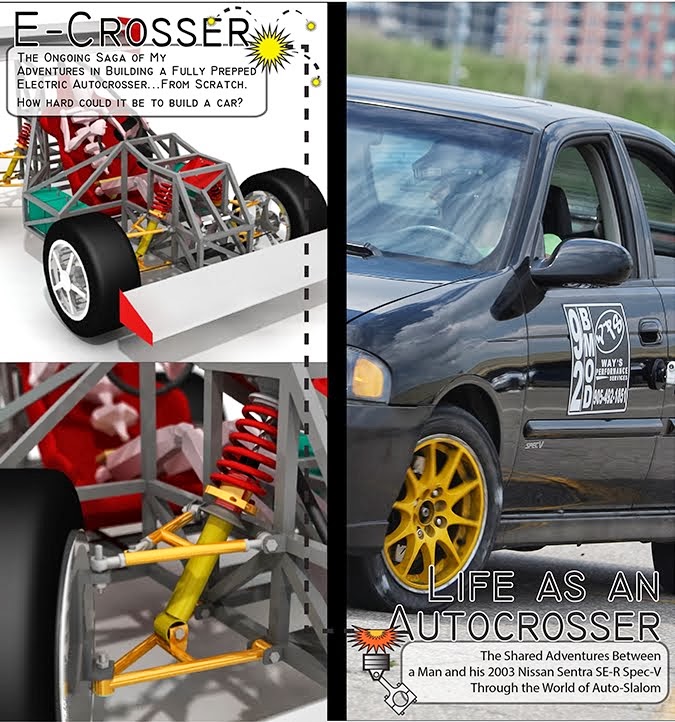
As we pulled out of Steamwhistle's rear parking lot, and accelerated onto Lakeshow Boulevard, I was given the taste of monumental power in the form of torque.  I have never felt such a linear feel in power delivery.  With my Sentra, the power is very curvy and once I get into the mid 3000's rpm, that is when the power is noticeable and it ramps up progressively.

With the P85+, as I entered the on ramp to the highway, it was immediate power, and I mean serious, linear power.  Even when I was at 100kp/h and wanted to pass someone, the power kicked me back in the seat instantly.  I'm glad the Tesla representative that sat with me was pretty cool with me having a bit of fun.

This was where my concern for the car was justified, because as excited as I was to drive this car, I was also a bit hesitant about how it would work.  Being that almost everything that normally would be mechanical in a car, the Tesla Model-S was powered by electric motors..

As I was making the curve from the Gardiner Expressway to merge onto the DVP northbound there is a downward ramp that can be done easily at 100kph.  As soon as I started to make the bend, the steering unexpectedly pushed back and fought me the entire bend.  It didn't feel like a mechanical weight, but more of a dead, electrical motor trying to mimic steering weight.  I felt very disconnected from the road then.  The feedback was nil.  And the artificial weight continued all the way around the bend.

As soon as the curve ended and we were travelling in a straight line again, the steering felt good again.  A strange feeling for sure, and one that made me feel uneasy with what I was doing with the car.

Next was the seating.  I was noticing in any maneuver, I was sliding around the seat.  Maybe the seats are meant for those corporate fat-cats, that are twice my size.  Who knows.  All I knew was, I really did not like how little lateral support I had, especially with a car that rode so flat and capably around bends.

I could not believe that a car that weighed more than 2100kgs could turn is so nicely.  There was a sense of balance, and poise, and as there should be since about 545kgs of batteries are placed at floor level.  The COG is the lowest in this class of car.

But those seats, gah!

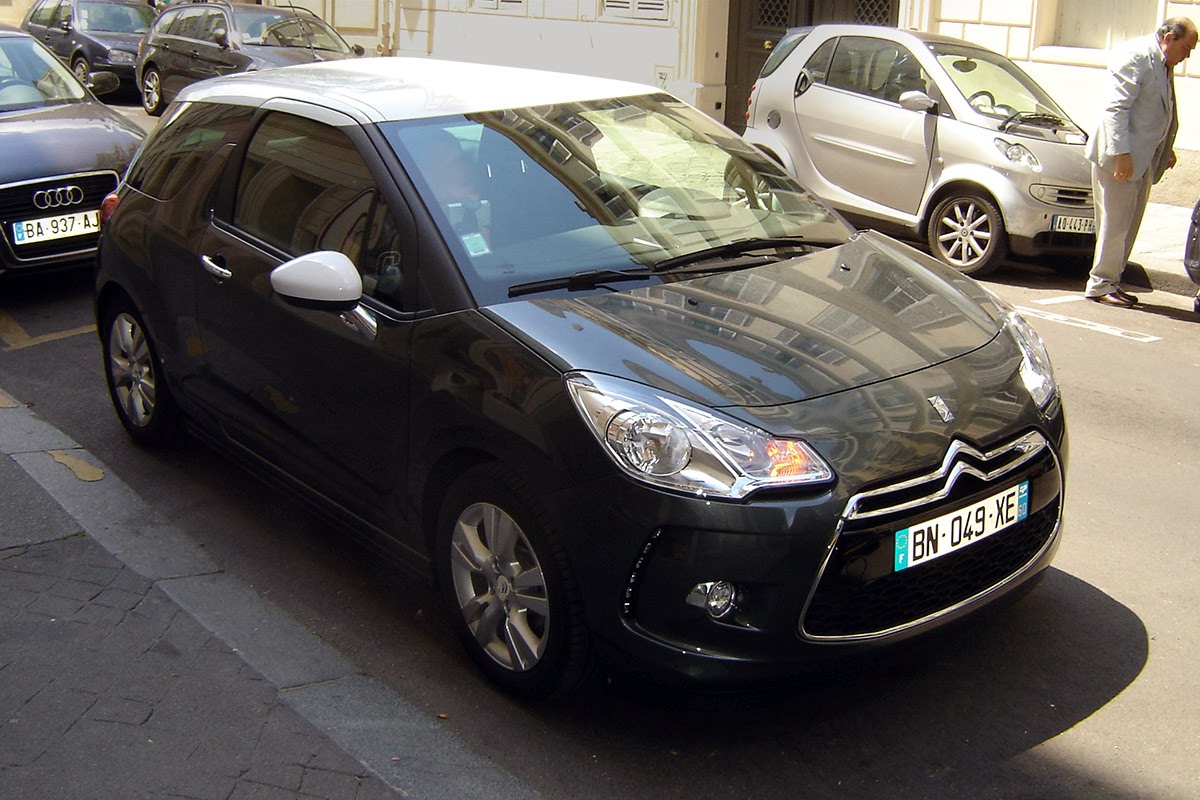
Also, this is completely subjective, and I'm sure that the new technological generation love that 17" LCD centre console.  Me, definitely not.  I remember back when I drove the Citroen DS3 while I was in France.  I loved everything about that car, except the stupid centre console LCD screen.  It was constantly shining in my face and at night, made that screen the most distracting, obnoxious gadget ever!

Only, with the P85+ that screen is about 6 times the size.  I can only imagine how annoying that thing must be at nighttime.  I was told there is a dimmer night mode, but, the DS3 had night mode too.  It didn't help.  I prefer to be able to see out my front window, and not have a spotlight in my field of view constantly.  I think I would maybe try and find someone to hack into the programming and code it so that the screen turned off completely after a minute of not being used, or at least put a sheet of 11" X 17" cardboard in front of it.  That should be an option.

I will say though, the screen was crisp, and easy to read.  It functioned like any tablet, which made it easy to navigate through.

After about 30 minutes of driving we settled back into the parking lot of Steamwhistle.  It was strange how I just slapped the column mounted gear selected into 'R',backed up into the parking spot silently, pressed the "park" button on the gear selector and stepped out of the P85+ without having to turn the engine off, like any standard ICE engined car.  All I had to do was exit the car and the car turned off itself.  Silently.  Waiting for the next person to sit in the cockpit.

The whole experience of driving the Tesla Model-S P85+ was a joy.  I hope it would be considering the Model-S with the P85+ package would be more than $125 000 Canadian dollars.

All in all, the car has it's flaws.  But then, how often do perfect cars come along.  Especially with a company that is barely a decade old, and evolving a technology the is revolutionary.

And, these flaws that I see, are not necessarily flaws at all to the market that the Model-S is geared toward.  Executives usually don't care about steering feel.  Lateral Support, well, chances are they will never take this car on a track, or do any spirited driving on an open country road.  The massive cabin and trunk space would probably sell them on the Model-S. For those things this car is a winner for sure.

The infrastructure for the electric car is still in its infancy but I was told that there should be charging stations continuously from Detroit to Montreal by this year.

The people who ran the event also, were extremely friendly and I had a tonne of conversation with them. They were enthusiastic about their product (which they should be of course) but I could tell that they were genuinely proud of what they offered.

The representative who rode with me has been following Tesla from day one and she applied, and applied, and applied to the company until they hired her.  She never gave up, and that is exactly the type of people who Tesla needs to promote their vehicles.  Someone who is that passionate about Tesla.

I just can't wait to see in 3 years what the compact version will be like.  I'm sure it will be just as big as a winner as the Model-S is.  That is, my opinion.


Monday 10 February 2014

Got 15 bucks and lots of stockpiled Crap? Bam! Make a Drill Press!

Frustration after frustration of not having a quick and simple way of making accurate holes and circles in a number of materials has led me to this very day, when I decided to make my own drill press on the cheap. It doesn't help also that that frustration is compounded by the endless days and nights of double digit temperatures below 0.  I just had to vent about this weather.

Since I am a bit unemployed at the moment, and money doesn't fly around me like a money tornado on a game show, I decided that I would build an epic drill press out of spare stuff I had lying around.

I've needed to cut circles in aluminum sheeting for clocks, I needed accurate 90 degree holes into bushings, or even drilling holes in 2 X 4's.  I've been able to get away with some things, but let me tell you, with a hand drill, it's impossible to get any sort of true accuracy without such a device as a drill press, unless you are a robot.  Are you a robot?  I'm not, so I rely on tools.

The stockpiled crap I used found in my awesome garage.:.

  • Left-over 1 1/2" X 3/4" poplar strapping.  Not a popular strapping...that's something else, on a website not like this.
  • Left over from who knows what of 3/4" X 6" pine board.
  • Left-over 1" mdf board.
  • Left-over 1" diameter piping, 90degree bend and mounts.
  • Left-over L-Bracket
  • Left-over 0.040" aluminum sheeting
  • Left-over IKEA Black wood laminate particle board
  • Found in the garbage 2" X 4" pine.
  • Used pipe band screw-type clamp. Say that 3 times fast.
  • Screws, washers, nuts and bolts to fasten it all together.
The crap I needed to buy because either i had none or no one threw this stuff away in the garbage in the past 2 years:
  • An extra pipe band screw-type clamp.  Again, say this 3 times fast.
  • A shiny pipe U-clamp.
  • Carpenters glue.  I only had white glue and white glue just won't cut it in my books.
  • A crazy extension spring.

And now, let's get started on building this contraption.  The next little bit might get boring so listen to this music as you read.   Relaxing music to read this boring stuff with.

Now that you have amazing music playing (yes chances are you hate this industrial music, but isn't it better than listening to your eyelids getting heavy?) Let's begin.

First, I spent some time designing the press and sketching it up.  I looked online at a number of resources and liked what I found.  I made a few tweaks to suit my needs.  And I had a lot of needs. What can I say, I'm a Needy-McNeedasson.

Once I was happy with the general design it was off to the garage and do what I do best...build stuff using stuff I have lying around.

I scrounged through all of my hiding spots where I keep crap in the garage.  The homemade built ceiling mounted storage space, the hardware containers hanging on my shelving, even in the dark and dingy corners where scrap-crap sometimes runs away and multiplies.

Once I found all the materials I needed, I looked at my designs to see how best to attack this beast.

I started with the slider that the power drill would mount on.  I used the existing poplar that I had, and the main backing board was pine board.  To keep the drill in place I drilled out the holes so the screw-type pipe band clamps could tighten the drill securely.  I also had to chisel out a notch because my drill has some protrusions on its housing and I needed to have the drill, once secured, as perpendicular as possible to the horizon, like a majestic flag pole sticking stright in the ground, flying a flag with pride.

Next I worked on the backing plate that had the 2 C-channels that the slider would slide in.  Up and down, up and down, smooth and silky like.  Except, wood on wood sliding action is actually not very efficient with the pourous nature of wood.  It actually doesn't slide very easily sometimes so, in order to have less friction between the slider wood and the backing plate wood surfaces I cut some aluminum strips, and attached them to the backing plate.

Now, when I did a test fit and did some more  test slides of the 2 pieces together, there was some slop.  It slid smoothly along the aluminum strips now with resistance low enough for a kitten to move it, but,  slop ain't good, especially on a drill press.  If there is slop, then there is inaccuracy as the drill head enters whatever material I happen to be using.

Using my portable and super-fly table saw I took off millimetre by millimetre of material until the slider and backing plate C-channels slid as flush as possible.  Only problem was, was that this super-fly table saw has seen better days, and the blade is not as sharp as it once was, so I made another aluminum strip  and attached it to one side of one of the C-channel's walls and added a slight arc to it so it acted like a spring.  This would keep the slider in tight, even if there was some tolerance between the C-channel and the slider because of my table saw's dull blade hacking away indiscriminately as I tried to rip tiny amounts of strips of wood away.

Next, I built the mainframe out of 1" diameter steel pipe I had.  I made a lever arm out of more 3/4" X 1 1/2" poplar and chiseled out some sections where the other connecting arms of the lever arm would attach..  The lower vertical attachment arm was secured to the vertical pipe with a couple of metal screws that I tapped into it.

I then made a quick base that would be disposable out of old IKEA particle board and mdf.  If there is anything that old IKEA particle board is good for, it's to be disposable.

In order for the drill press to withdraw from whatever material I happen to be using, I attached one end of an extension spring on the backside of the slider and attached the other side to the backing plate.  Once the slider is pushed as far down as possible, if I let go of it, it will raise back up.  Just like a drill press should.

Fully Extended Press.  Check out that Spring Action.

A Glamour Shot of the Device.
I put the entire assembly together as a proof of concept, and made sure everything worked as I designed it to.  Once I have a successful working test with the hand drill, it'll be time to disassemble it,  finish all the pieces so they look all pretty, and then reassemble it as a final, awesome, home-made drill press.


It works great as a proof of concept, and it was cheap to build.  The sliding action is silky smooth, and the retraction action works as planned.  I could also attach a a knife blade and make it a kickin' awesome cheese cutter.  Maybe even attach a potato masher to it and make industrial scale amounts of mashed potatoes.  The possibilities are endless.

I think I'll stick with the drill press idea though.


Monday 20 January 2014

Equations Make the Chain Go Round.

Because I'm just that kind of person, I tend to do things a little more involved than what they have to be.

First, it was learning the constraint systems in 3D Studio Max so I could animate the suspension.  That was not really needed to complete the designs of the E-Crosser.

Now, it's learning Wire Parameters.  Basically what those are is constraining one object's movements/rotations/or any other characteristic to another object's characteristic based on a certain equation.  The example is seen below but imagine that you have 2 cogs.  One has 39 teeth, the other has 14. The smaller cog needs to spin in ratio to the larger one...but that's not all.  the drive chain has to move along a track and fit in the teeth of the cog properly.  Makes sense?No, well, watch the video then.

I've decided that the E-Crosser LMA will be chain driven with hopefully only 1 gear.  Electric motors are torque monsters so I am confident this approach will work.  I am still waiting for information from an electric vehicle specialist about these kinds of details.

The electric motor I'll be using is the HPEVS AC7X series motor.  These motors produce about 74 horsepower with...wait for it...180ft-lbs of torque.  Yummy!

I could suffice with the AC-5X series which has a peak of about 121 torques.  Time will tell.  Not as tasty but more than enough power.

In the meantime I modelled up the electric motor, cogs, brackets and chain drive.  I created a short 2 second animation test to make sure that my equations were right and things moved accordingly.

I am definitely no math genius.  Hell, I'm barely a math idiot.  So doing the equations took a lot of trial and error.

Check out the math! ANd check out he floating drive gear.  Oooooooooo, ghosts.


And some pretty pictures of the whole contraption.


Also, since I have gobs of spare time, I am learning more about the physics engine in 3D Studio Max.  I decided to render up and composite a picture.  It was just something to fill my time and I thought I would share.  The pebbles were strewn about using the gravity amd physics abd a little bit of magic.  Enjoy.

It's a Cone!

Thursday 26 December 2013

E-Crosser LMA Suspension Animation

Who doesn't like a sweet simple technical animation?

In order to make sure there are no physical conflicts between parts, I decided to learn the constraint system in 3D Studio Max.  I'm very proficient in model-making and rendering in the program, but for animation, I actually went to school for Softimage so the functions are quite different.  Also, it has been well over 10 years since I went to school so it was a good refresher.

In order to see the full suspension, I removed the car frame, and left the brackets that the A-arms, steering rack and sway bar connect to it with.

It was fun re-learning the constraint systems so the suspension rotated, compressed and moved properly.  There are still some bugs with the actual movement but I got exactly what I needed from the animation.

Enjoy this short 2 second video.  It is very low resolution (I don't have exactly the fastest computer.  The render time for this 2 second/60 frame video was 10 hours). Enjoy the yumminess of computer animation.

Hope your holidays treated you well and the New Year's brings something super sweet.

Monday 16 December 2013

Laid Off but Not Laid Up. E-Crosser LMA Refinement, and Times a Tickin'

It has been quite a couple of weeks.  I know I've started of my blogs that way before, but this one takes the cake for a shocking turn of events.

I was laid off 2 weeks ago.  It was pretty surprising, and I had no idea it was coming, but when you see a line of people streaming into your bosses office, with the blinds down, you kind of know something was going on.

The day started like any other, but the craziness started after lunch when one of the designers that had worked there for almost 7 years started to pack up his stuff.  The rumours started flying around like wild fire, and work came to a grinding halt.

People started to congregate at each other's cubicles, wondering what was going on.  And not 20 minutes later, the drizzle turned into a torrential rain storm.

My close colleague was called in, and we all knew then what was happening for sure.  He came out, started to collect his stuff, well, what he could because he was instructed to leave immediately, and basically said that he was gone..

30 minutes later, I got my call.  I will be honest, I was a bit nervous, and shocked because I had been there for a very long time, and was a senior of the department.  I had no idea it was going to be my turn   All of that experience and knowledge meant nothing when the "powers that be" looked at the numbers of the department.

As the meeting progressed and words like, "downsizing", and ,"budgets" were thrown around like shit in a monkey pen, my mind started to change.  This was actually an opportunity for me to find something that I really enjoyed.  I was free to take charge of my life again.

After I got the talking to, I walked out of the office, not upset or scared, but joyous.  Yup, joyous.  I got paid off to leave basically and find something that I am truly passionate about.  I'm also starting to learn HTML5 and CSS.

I can't blame them, as that is what big corporate businesses do.  They look at the numbers, and if they don't add up to what they like, they do what they have to do.  I may be understanding about this situation, but I gladly take sympathy beer, even if it comes with a side of sympathy head tilting, and condolences.

Random scary thoughts of desolation, and homelessness sometimes come to mind, but, I know who I am, and I know that I will be working hard to find a new job.  I'm not one to just sit around and play videogames.  I always need to do something that gets my mind and body active.

So now, let's talk about the E-Crosser LMA(I used to call it LMP but now it's Le Mans Autocrosser-LMA).

The entire frame and shell has been designed, as well as the suspension and steering.

The shell will be using aluminum sheeting and draping it and riveting it to the frame.

The front suspension is complete now, with many alterations and changes from the original design.  As I was designing the suspension in the last revision, I was finding that the dimensions were getting larger and larger. That was something I was not liking because keeping the frame as tight as possible would be advantageous when racing around the cones.  A complete frame change was in order, to get the dimensions back to the Toyota Yaris territory.

A lot of my research has been with the Formula SAE cars that are extremely popular with the university kids these days.  Those damn kids tearing around parking lots with their crash bang music blaring, and leaving tire skid marks all over the asphalt...Cool!

It's a seriously cool concept.  A fictional company has contracted these students to build a race car with a spec type engine, and limited performance rules.  I wish I knew about this when I was in college.

Anyways, these students come up with some genius solutions for things.  Some are a bit too complicated, and some are just not feasible at all in regards to manufacturing.  What they lack in practicality sometimes, they more than make up for it with fly in the face to conventional tactics.  I love it and I learned a tonne.

As for the E-Crosser LMA, my concept is about simplicity of concept.  There's no push rod suspension here. For the E-Crosser LMA, it may look like a protoypre; at least a boxy prototype, but it is all about grassroots mentality.  If something is damaged, it's easily fixed, and doesn't cost a fortune to fabricate a part using CNC, or 3D printing.  It's sort of like the Daytona Prototype concept over the Le Mans Prototype.

The Daytona's are basically a tube frame using some high tech stuff, but it was not about aero.  It was more about mechanical grip and simplicity and cost efficiency.  The Le Mans Prototypes on the other hand, are extremely high technology pieces of jaw-droppingly awesome design.  Nothing is cheap on those, and repairing one...well, let's just say, if you crashed one, you might not be racing in the next race because things take time and money to repair it.

The E-Crosser LMA is all about the steel frame, aluminum skin and rivets, and a lot of off the shelf parts from wrecked out cars (steering rack, and braking components)

Here are the renderings for what I've done so far.  I really like where this is now heading.  It looks cool (to me at least) and it is as simple as I can make it.

The Finalized Shell As Seen in Orange.
The Rear

In Red

Front Suspension
A View from the Cockpit

Steering Wheel Hub
Steering Rack and Column.   Mmmmm Carbon Fiber.

The Braking System

Right Front Suspension, Sway Bar and Braking System.  No braided steel lines yet.
Left Front Suspension Shot

Once I finish up the rear suspension, I will be posting up a supplemental graphic to show what is what.  So right now, you have to just enjoy the pretty pictures without much explanation.

SIDE NOTE: Not Your Grandma's Cuckoo Clock

With having some time off of working an 8-5 job, I thought I would keep busy.  I've had an ongoing log of random thoughts, and I finally got to one of them.

I wanted to build clocks using old used up car parts I had lying around.  So I took a couple of days to design and build a couple of them.  They turned out great, and hey, if need be, I could make a few bucks with these.  I'd buy one, would you?  Just make sure you anchor the hook into the wall...these are not lightweight.
TwinchRacing Disk Brake Clock


Wednesday 6 November 2013

Amid all the Controversy...E-Crosser Continues

With all this controversy in Toronto with our mayor and all the internet distraction it's hard for me to stop and work on the E-Crosser.  I mean, come-on, we should have a week off to deal with this.  How is anyone working that lives in the GTA?

With thousands of megs of digital hoopla swimming around the internet it's tough to get through it all, but good thing I'm diligent and I powered through it all, and here I am to say that more of the design has been created.

With the original concept, I started working on the rough 3D frame of the new E-Crosser using 1.25" diameter and 1" diameter steel tubing.  I am working right now on the basic shape and aero of the body and once I finish the concept, I'll be adjusting the frame to accommodate the hardware like steering rack, suspension, pedals, batteries, motor, windows, etc.

The body shell will not be like this exactly as this is only to get the basic shape of the car.  At the end of it all the aluminum sheeting will be riveted to the main frame, and almost none of the tubing will be seen...unless I decide I like the look, because as I see it now, the frame being exposed gives the E-Crosser a unique look.  Hmmm. What to do?  What to do?

Also, as I was designing this I was thinking I may not add doors.  It's actually something I'm not sold on yet, but I'm thinking it's weight I may not want.  Plus then there is no need for ventilation into the cabin.
Front of the E-Crosser.

Rear of the E-Crosser.

Well now it's time to go back to the circus that is Toronto politics.

Monday 21 October 2013

End of Season Report, and The Anatomy of Nissy.

And so the 2013 PITL"Push It to the Limit" season has come to an end.

It was another stellar year for the series with car numbers getting as high as 110+ cars.  It's nice to see so many people out there thrashing their cars around the cones, but with such a limited size parking lot, it is starting to get quite crowded, and I think that there should be a cap, or even pre-registration to limit the cars to 90.  The organizers have done an amazing job keeping things on track, but days have gotten quite long with the numbers.

Now, because I was away in Virginia during Race #8 I was not able to compete.  The last couple of weeks were a bit nerve racking because I was so close to loosing a podium spot in my class.  All I could do is wait and see.

When the results were made official and uploaded onto the internet, I nervously scrolled through the classes to see if I was able to hold onto my third in class.

Scroll...A-Stock...Scroll, scroll...A Mod...Scroll, scroll, scroll...B-Mod.  That's my class, and low and behold, I was able to hold onto my 3rd place finish!  Unfortunately, I had to share the bottom step as I had 36 points for the season, and a fellow B-Modder driving a Volvo C30 had 36 points as well.

Still I'm not too upset.  I was relieved because I really thought he was going to topple me off.  I gladly shared 3rd spot, he was a great competitor.

The winter is slowly rearing its ugly head now, and I am almost complete converting the car from super-fun-summer-mode, to I-hate-driving-this-car-in-winter-and-I'm-glad-I-don't-drive-to-work-mode.  I have a little bit of time so I wanted to share exactly the tool of my trade, my 2003 Nissan Sentra SE-R SPEC-V.

My car has been a serious work in progress now for I'd say close to from the day I purchased her.  I always knew that I would never sell her, so even when the bank still owned her, the modifications began.

At first I was not very focussed on what I modified, but I knew for sure that the faulty exhaust manifold was going to be one of the first things to go.

Nissan always knew that there was an issue with the pre-cat in the stock manifold, which led to little bits of "cat" to get sucked into the cylinders resulting in a number of engines dying prematurely, so I decided that I would get rid of it altogether and install an exhaust header.

Other than that, I really did not have a proper plan.  I just slowly added bolt-ons aimlessly through the first couple of years.  If the car felt faster, I was content.  It was purely unscientific.  I can't even count how many mufflers I went through because I was not happy with the sound that was coming out of the loud end.

My focus only sharpened when I started to autocross about 8 years ago, and the rules of the series forced me to re-examine what modifications would benefit me most on the track.  Obviously number 1 was me, and I did what I could to improve that through experience, school, and a-ha-lot of research.

Most of the development mechanically has been on the suspension side of things.  I first started with K-Sport Coilovers, which were nothing but a headache.  I was constantly replacing the upper strut bearing because they just could not cope with the constant pounding of the unsmooth pavement in the parking lots I was racing in.  The damping felt all wrong for the spring rates and it felt more like my suspension was nothing more than solid bricks.  Teeth shattering does not describe it fully.

After 3 years of constant stress, with those coilovers I moved up to Adjustable Koni Sport dampers, with Ground Control threaded sleeves, and 325lbs-front/525lbs-rear Eibach Springs.  The new setup was a complete 180 degree turn from the K-Sports and I thought I found the answer to my competitive dilemma.

Unfortunately, even though I was progressing in the right direction, I was still bottoming out the fronts constantly on larger bumps in the pavement.  Even raising the car and adding more damper travel a bit did not help, so the only answer was to increase the spring rates to limit the amount of travel.  I moved up to 525lbs in the front and 600lbs in the rear.

With such high weight springs Koni informed me I was borderline maxing out the dampers and they may not survive.  I decided to take my chances, and with the change came a new sense of speed.  The car felt super planted, and there were no issues with hitting the bump stops.  I could tell that it had some very heavy springs, and yes, driving over train tracks is a bumpy proposition, but generally, the damper/spring combo is very compliant for what it is, and very comfortable in most cases.  I was very happy until I moved up to using very sticky D.O.T. R-Comp tires (Toyo R888, RA1, and Hankook Z214 c71).

The added forces now when I was taking corners was translating into the steering column and I was losing my alignment after every race.  The temporary solution was to add Torrington Bearings on the upper strut perches.  This fix definitely helped, but after 2 seasons of racing the stock steering rack bushing has given up the ghost and my alignment issues are back.

This off season I am going to have a solid bushing lathed out by Wayne Yeates of Way's Performance Services(actually his brother will be doing that) and it will be installed into both my steering racks.  Hopefully from then on, my steering issues will be resolved.

On top of that steering rack bushing, the new bumper splitter that I designed, and vac-formed will be installed.  This splitter has been a 3 year project, with many, many design tweaks, and test vac-forms.  I finalized a design that was functional, and really cool looking.  But it's not just a splitter.  I also have a full undertray designed to smooth out the airflow under the engine compartment all the way back to the half-shaft.

Also, one of the front Koni's did bottom out in New York State entering Pennsylvania, over the worst maintained highway I have ever driven on.  Quebec's roads would be considered the Circuit of the Americas race course compared to this sorry looking excuse of a highway.  Because of this, I am now forced to re-valve all my Koni's to be able to handle the spring rates properly.  I'm sure at the end of the day it will all be worth it, but I was hoping that those dampers would have lasted longer than they had.

Brakes were also an ongoing issue.  Through the first 3 years of autocrossing I went through innumerable brake bleeding sessions with just as many different brake fluids because it kept feeling like I was getting severe brake fade.  I was almost resigned to the fact that I may have had to upgrade to either the 300ZX brake system, or go one step further and get a big brake system from Wilwood.

It only took a passenger who was a race instructor from Ian Law Racing to recognize that my ABS was kicking in prematurely, and constantly.  The solution, pull the ABS fuse.  Now since I have done that seemingly simple thing, the brakes are constantly at peak performance.  They bite so much harder, but, it did take me a few races to adjust my braking style.  I now have to squeeze much more progressively, instead of just stomping on the pedal and let the computer sort things out.

Well the winter is coming and I have a lot of work still to prep around the house.